在CentOS 6.5操作系统上安装和配置Nginx是一个相对简单的过程,但需要一定的步骤来确保成功,以下是详细的步骤指南:
Nginx的安装与配置
1. 安装必要的依赖包

在安装Nginx之前,需要先安装一些依赖包,这些包包括gcc、pcre、zlib和openssl,这些包可以通过YUM仓库进行安装:
yum install gccc++ pcre pcredevel zlib zlibdevel openssl openssldevel y
2. 下载Nginx源码
从官方网站下载Nginx的源码包,可以选择一个稳定版本,例如1.9.9:
cd /usr/local
wget http://nginx.org/download/nginx1.9.9.tar.gz
3. 解压源码包
下载完成后,解压源码包:
tar zxvf nginx1.9.9.tar.gz
4. 编译和安装Nginx

进入解压后的目录,并运行配置、编译和安装命令:
cd nginx1.9.9
./configure prefix=/usr/local/nginx
make
make install
5. 启动Nginx服务
进入安装目录并启动Nginx服务:
/usr/local/nginx/sbin/nginx
6. 验证安装
通过浏览器访问服务器IP地址或域名,如果看到"Welcome to nginx!"页面,说明Nginx安装成功。
Nginx的基本配置
1. 配置文件位置

Nginx的主配置文件位于/usr/local/nginx/conf/nginx.conf,可以根据需要进行修改,例如设置监听端口、日志文件等。
2. 常用配置示例
以下是一个基本的Nginx配置示例,用于设置一个简单的静态网站:
worker_processes 1;
events {
worker_connections 1024;
}
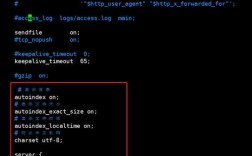
http {
include mime.types;
default_type application/octetstream;
sendfile on;
keepalive_timeout 65;
server {
listen 80;
server_name localhost;
location / {
root html;
index index.html index.htm;
}
error_page 500 502 503 504 /50x.html;
location = /50x.html {
root html;
}
}
}Nginx作为反向代理服务器的配置
Nginx不仅可以作为静态和动态网站的服务器,还可以作为反向代理服务器,以下是一个简单的反向代理配置示例:
http {
    upstream backend {
        server backend1.example.com;
        server backend2.example.com;
    }
    server {
        listen 80;
        server_name example.com;
        location / {
            proxy_pass http://backend;
            proxy_set_header Host $host;
            proxy_set_header XRealIP $remote_addr;
            proxy_set_header XForwardedFor $proxy_add_x_forwarded_for;
            proxy_set_header XForwardedProto $scheme;
        }
    }
}
Nginx的防火墙配置
为了允许外部访问Nginx,需要在防火墙中开放80端口(HTTP)和443端口(HTTPS):
/sbin/iptables I INPUT p tcp dport 80 j ACCEPT
/sbin/iptables I INPUT p tcp dport 443 j ACCEPT
/etc/rc.d/init.d/iptables save
Nginx添加到系统服务
为了使Nginx能够在系统启动时自动启动,可以将其添加到系统服务中:
vi /etc/init.d/nginx
在文件中添加以下脚本:
#!/bin/bash
nginx Startup script for the Nginx HTTP Server
it is v.0.0.2 version.
chkconfig: 85 15
description: Nginx is a highperformance web and proxy server.
It has a lot of features, but it's not for everyone.
processname: nginx
pidfile: /var/run/nginx.pid
config: /usr/local/nginx/conf/nginx.confnginxd=/usr/local/nginx/sbin/nginx
nginx_config=/usr/local/nginx/conf/nginx.conf
nginx_pid=/var/run/nginx.pid
RETVAL=0
prog="nginx"
Source function library.
. /etc/rc.d/init.d/functions
Source networking configuration.
. /etc/sysconfig/network
Check that networking is up.
[ ${NETWORKING} = "no" ] && exit 0
[ x $nginxd ] || exit 0
Start nginx daemons functions.
start() {
if [ e $nginx_pid ];then
echo "nginx already running...."
exit 1
fi
echo n $"Starting $prog: "
daemon $nginxd c ${nginx_config}
RETVAL=$?
echo
[ $RETVAL = 0 ] && touch /var/lock/subsys/nginx
return $RETVAL
}
Stop nginx daemons functions.
stop() {
echo n $"Stopping $prog: "
killproc $nginxd
RETVAL=$?
echo
[ $RETVAL = 0 ] && rm f /var/lock/subsys/nginx /var/run/nginx.pid
}
reload nginx service functions.
reload() {
echo n $"Reloading $prog: "
killproc $nginxd HUP
RETVAL=$?
echo
return $RETVAL
}
保存文件后,赋予执行权限:
chmod +x /etc/init.d/nginx
chkconfig add nginx
service nginx start
常见问题解答(FAQs)
Q1: Nginx启动失败,提示“nginx: [emerg] bind() to 0.0.0.0:80 failed (13: Permission denied)”怎么办?
A1: 这个错误通常是由于非特权用户尝试绑定到80端口导致的,可以使用以下方法解决:
1、修改Nginx配置文件中的用户,将user指令改为当前用户:
user root; # or any other user with sufficient privileges
2、或者以root用户身份启动Nginx:
sudo /usr/local/nginx/sbin/nginx c /usr/local/nginx/conf/nginx.conf
3、确保防火墙和SELinux没有阻止Nginx绑定端口,可以使用以下命令关闭SELinux(不推荐长期使用):
setenforce 0
Q2: 如何更改Nginx的默认根目录?
A2: 要更改Nginx的默认根目录,可以编辑主配置文件nginx.conf,找到server块中的root指令并修改为新的路径。
server {
    listen       80;
    server_name  localhost;
    location / {
        root   /new/path/to/root; # 修改此处为你的新根目录路径
        index  index.html index.htm;
    }
}
保存配置文件后,重新加载Nginx配置:
/usr/local/nginx/sbin/nginx s reload